
Being a discussion of tools of the trade.
“There is no gate, no lock, no bolt that you can set upon the freedom of my mind.”
— Virginia Woolf
(Trigger warning for this post– there is some discussion of animal cruelty in terms of sourcing fibers for “natural hair” brushes. If you don’t want to read about that, skip from the picture explaining the different parts of the brush to the header called “Types of Brush.”)
Hello and welcome to The Feminist Lipstique. I’m your hostess; today you can call me Glitz Woolf. I’m a feminist in my early 30s who recently became obsessed with makeup, and is trying to learn how to say the word “spoolie” without giggling.
If you’re anything like me, you grew up knowing that there were exactly three (3) kinds of makeup brushes: there was the short thick brush for your blush, there was the short thin brush for your eyes, and then there was that double sided foam brush thing with the pointy foam on one end and the round foam on the other that you were absolutely going to tear at some point and wind up stabbing yourself in the eyelid.
So again, if you’re anything like me, when you started getting serious about makeup, you had the thought, “Who the hell invented all of these brushes and what are they FOR?”
There are SO MANY BRUSHES. And then there are also SO MANY OTHER THINGS you use to apply makeup. And it gets complicated. So let’s start with the basics.
Most of the sections about brush basics are based on/kinda shamelessly stolen from the fine people at the Hair and Makeup Artist Handbook, and specifically the article found here.
Brush Parts
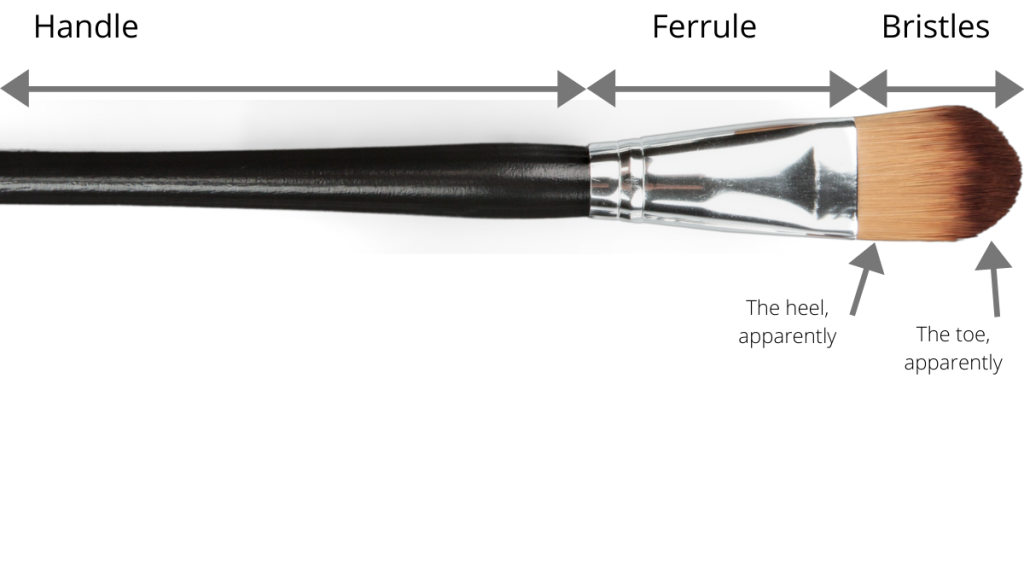
A makeup brush is made up of three separate parts. There is a handle (usually made of wood, plastic, or the crushed dreams of ex-Project Runway contestants)and a metal connector part called a ferrule (my new favorite word/possibly a kingdom in a fantasy book). The part around the handle is usually held there by glue, and the part near the bristles (snap, spoiler warning for the next part of the brush) is sometimes pinched shut around the bristles and also usually held there with glue. Further spoiler warning, when we start talking about washing brushes later we are going to talk about WHY YOU DON’T GET THE FERRULE WET. Don’t do it. The final part of the brush consists of the bristles. (Damn, it doesn’t have the same impact since I ruined the surprise.) The people at the Hair and Makeup Artist Handbook are fancy enough that they inform me that the part of the bristles next to the ferrule is called the heel, and the part you use to apply product is called the toe, which are things I learned literally just now. The size, length, density, and softness of the bristles are the biggest factors in how the brush applies product, and usually determine what the the brush will be used for. Below is a diagram showing you the brush parts, that is admittedly just an excuse to say the word “ferrule” again. (Also I made the picture extra big on purpose, because we’re going to start talking about bristle types after this, and trigger warnings aren’t helpful if you accidentally read the stuff you were trying to avoid.)
Bristles
Makeup bristles can be either synthetic or natural.
Synthetic bristles are made of (duh) synthetic materials like nylon or polyester. In general, they are less likely to shed, less likely to absorb makeup into the pores of the fiber, and less likely to get destroyed via washing or rough treatment. They are also usually cheaper than natural bristle brushes, by orders of magnitude. They are generally thought to be less soft than natural bristles, and obviously lose out on the whole “biodegradable” front. If a makeup artist uses both synthetic and natural brushes, they are likely to use the synthetic brushes for liquid, cream, or gel product applications.
Natural bristles, like Soylent Green, is made of people. (That’s a lie, I just thought it would be funny.) Natural bristles are what we used for makeup for centuries. If I were a better, more ethical blogger I’d look up the exact time we started to transition to synthetic fibers, but I didn’t do that. I’m gonna ballpark and say we started using synthetic material sometime between the Industrial Revolution and the 1970s. (This, my friends, is how you win at Timeline.) Natural bristles are made of animal hair, including, (according to the Hair and Makeup Artist Handbook folks):
“[G]oats, badgers, squirrels, weasels (“sable”) and horses (“pony”). Camel hair brushes are not actually made from camel hair, but a combination of several types of animal hair (including horse, goat and squirrel), depending on the desired softness and cost.”
In general, natural brushes are thought to be softer than synthetic brushes, but also shed more easily, mold more easily if not dried properly, absorb more product into the pores, and are biodegradable, considering they are made of biological matter. They are usually much more expensive than their synthetic counterparts because a lot of the labor for them is done by hand, and because it’s a lot harder to find 400 squirrel hairs that are the same color, texture, length, and quality than it is to mass produce 400 identical synthetic fibers. If makeup artists use natural brushes, they’re most likely going to use them for powder products.
Obviously, for many consumers the biggest difference between natural and synthetic brushes is the ethics of the brush. Depending on who you talk to, natural hair bristles are either totally ethically sourced from naturally shed hairs or are harvested via a pretty brutal process by farming and slaughtering animals. While I think that it is certainly possible that some brands use ethically sourced hair, my gut feeling tells me that this isn’t the case for most natural hair brushes. They are just produced at too high a frequency, with too much uniformity in the hair, to be the result of someone painstakingly collecting shed hairs.
I will be completely honest and tell you that (to my knowledge) I have never used a natural hair brush. I can’t speak on a personal level as to the differences between them and to the superiority of one over the other. But for a mixture of ethical and practical reasons (I already get enough shit for not being a vegetarian or vegan and don’t need more bad karma, I am pretty rough on my brushes during cleaning and don’t need additional problems, and I’m often cheap as hell) I have always used synthetic brushes and likely always will.
Now have a biiiig picture of lots of types of makeup brushes just for funsies/to spread out the end of talking about animal cruelty from the beginning of talking about makeup brush types.

Types of Brush
Here is where things start to get complicated.
There are a lot of makeup brush types. A lot. So many. In this explainer from a site called Dermstore, there are ten, plus a blending sponge. In this guide from Groupon of all places there are 20. In this video from Spankie Valentine TV (no I am not making this up, I swear to God) there are 38.
I was originally going to try to explain every single one and their uses, but I honestly think that is pretty well accomplished already by any of the things I linked. So instead I’ll try to explain which of the five million brushes I think are useful for a beginning kit (using the Grroupon list as a base):
Blending eyeshadow brush or eyeshadow brush: You want at least one eye brush with longer, less packed bristles to loosely apply eye pigment and do blending.
Angled liner brush: The main brush that a lot of people use for eyeliner is a tiny, whispy thing. I’m afraid I’m going to accidentally murder it. So if I’m putting on any cream eyeliners or using eyeshadow as a faux eyeliner I’m using this, though I also sometimes use this type of brush for things like concealer.
Smudge brush or packing brush: You want at least one eye brush with shorter, more tightly packed bristles that can pack on eyeshadow or smudge eyeliner.
Spoolie and/or brow and lash comb: A spoolie is the most fun thing to say other than “ferrule.” It helps you brush your brow hairs into place, and can help soften color after you’ve applied brow product. A lot of brow pencil things will come with a spoolie on one end automatically. I’ve also used it in the past to separate my lashes after mascara, because I basically went, “Well THIS seems similar to a mascara brush.”
A brow and lash came is the double headed axe/hammer of the beauty world– the brushier side is also used as a brow grooming product, and the comb side is used to separate your lashes after applying mascara.
Lip brush: This brush is originally intended to help apply lip liner or lipstick in a precision fashion. And I have occasionally used it for its intended purpose. But most of the time I use it as a concealer brush for any of my cream concealers.
Highlighter brush or contour brush: I admittedly use these pretty interchangeably. The contour brush is meant for more precise application, but if you’re either very careful or very bad at things (guess which one I am!) you can get fairly similar results from both. You can use these brushes for highlighter, bronzer, blush, and contouring.
Powder brush: Also known (to me) as “The big floofy brush.” You should probably have at least one large, fluffy brush to apply setting powder or foundation powder, or just to blend your face look after you’ve finished applying things.
Flat top foundation brush: This one is kind of cheating, because it can be a lot of different types of brushes. The main points are for it to have a flat top on the bristles, and to be fairly densely packed with bristles so that it works well with cream foundation and concealer.
Things That Aren’t Brushes
In addition to all of the brushes that exist, there are many things that are NOT brushes that people use to apply makeup, because they like to make my life difficult.
Sponges
The most common thing you’ll find people using to apply makeup besides brushes is a beauty blender or beauty sponge. There are a lot of different shapes and sizes for these, too, and I….. do not understand most of them. Feel free to look at the guide here and try to understand things better than I do.
I use beauty sponges a lot, at least partly because I don’t want to wash my brushes as often as you should if you’re spreading cream product with them. I have an egg-shaped one, a teardrop-shaped one, and a pear-shaped one (I have also heard that one called an hourglass). At one point I also had one that was basically just an oval with two flat sides, and I have no idea where it went. In general, it’s good to have a sponge with at least rounded side for general application and one pointier side for detail application. I’ve been told that having at least one flat side is also good for foundation application, but again, I lost that one into the Neverwhere. Make sure that you get the sponge wet and squeeze it out before using it (so it absorbs less product) and make sure you are using bouncing motions instead of wiping motions when you apply makeup. (We’ll talk more about that when I finally start talking about applying makeup, which will be… someday.)
There are also microfiber sponges, but from what I can tell their popularity is about 80% due to undisclosed sponsorships and they are harder to clean, so I kind of ignore them.
Silicone Makeup Sponges
These things have caused So Much Strife in the beauty community. Some people adore them, some people (like my lord and savior Robert Welsh) hate them. They are usually discs of silicone, and the idea is that they can apply product without absorbing and wasting as much product. However, that does make things pretty hard to blend, so I prefer ones like this one from e.l.f. that has a flocked side as well for blending. Though to be honest I usually forget that I own this, and use either a sponge or brush for most things.
Makeup Puffs/Poofs?
I think these mostly exist so that you can still feel like a luxurious, old fashioned lady picking up her powder puff and powdering her face. Ostensibly it is used to apply powder products and do some blending. Tati Westbrook released a set of puffs that kind of broke YouTube for a while as people debated whether they were pointless or not. The world is still undecided. I don’t have any poofs. I am distrustful of them.
Cost
Repeat after me: I will not spend $20 on a makeup sponge from Beauty Blender. It is a damn sponge, and there is nothing they could possibly do to make it worth $20. I can find equally good sponges for $1-5. Again, it is a damn sponge.
Good job. Okay, now that we have that out of the way, everything else is a lot more subjective. As we learned from the big post on cost/value, there is an insane range of prices for brushes and other beauty supplies. And I will be honest, I basically only have experience with the cheap stuff. 80% of my brushes and tools come from Wish. The other 20% come from cheap sets from Wal-Mart or discounted sets from Ross. The main criteria I usually had when purchasing these sets goes as follows:
Are the handles shaped like mermaid tails, unicorn horns, or crystals?
Are the handles and/or bristles multicolored and/or purple?
…. That was it, that was my purchasing criteria. As you can tell, I am a very discerning shopper.
I lucked out with this method and got a couple of fairly comprehensive brush sets this way. Their quality doesn’t seem to be amazing, but it is definitely higher than “the brushes you get in the eyeshadow or blush packets from CoverGirl,” so I’m calling it good enough. And it is hard to tell the difference between some brushes falling apart because they are bad products and some brushes falling apart because I don’t pay enough attention when I’m washing my brushes and I got the glue holding the ferrule on wet and it disintegrated.
If you’re not willing to trust your fate to Chinese mass production and insanely long delivery times like I did, I have seen beauty bloggers and vloggers recommend brushes from e.l.f., Real Techniques, and Sigma (in advancing order of cost… I think.)
Cleaning Your Brushes
Cleaning makeup brushes is incredibly important, and also an absolute pain in the ass. Cleaning your brushes frequently prevents the buildup of bacteria (fairly important for something we’re putting on our faces, especially in an age of plague), helps prevent color transfer between palettes (or on your face). This article from Allure recommends washing face product brushes once a week, minimum, and eye product brushes a couple times a month, minimum. Currently I try to wash all of my brushes once a week, and I kind of have a system.
I keep all of my brushes in a big glass jar that I bought from the crafting section of Wal-Mart, so I ostensibly saved it from a life of being filled with colorful rocks or something. It’s clear glass, so I can see brushes through the sides, and tall enough to keep the brushes from tipping out while short enough that I can still grasp even my shortest brushes. As I use brushes, I put them into a repurposed toothbrush holder that is totally blinged out with glass and silver paint, because my toothbrush holder is apparently cooler than I am.
If I want to reuse the same brush during the week, or even during the same look for a different color, I rub it on a color removing sponge like this one. (I also make sure that sponge gets cleaned once a week.)
On Sunday, or when I run out of room in the toothbrush holder, whichever comes first, I wash my brushes. I follow the same general order of operations from the Allure article, though instead of rubbing the bristles on my palm to clean them, I use a silicone brush cleaning pad like this one that has different textures to help work the pigment out of the brush. Once they have dried, back in the jar they go! As I have mentioned multiple times, DO NOT GET THE FERRULE WET. Getting that portion of the brush wet can weaken or disintegrate the glue that holds it to the handle or to the bristles, and you have suddenly beheaded your favorite eyeshadow brush. And you set it aside and say you’re going to fix it with hot glue later, but are you really?
There are also these things that spin the brush to clean and dry it, but according to the reviews your makeup brush handles have to be pretty standardized in order for it to work, and well… my brushes are mostly shaped like mermaid tails, unicorn horns, and crystals. So that won’t really work for me.
Cleaning Your Sponges
Please, for the love of all that is good, remember to clean your sponges as well. There are So Many Bacteria trying to hang out in there. You should be cleaning your sponge on the daily. Run it under warm water and give it a couple of gentle squeezes to get excess makeup out of it. Then rub it all over either with brush soap or just regular soap, scrub gently all over it (if you start digging divots out of the foam you’re doing it wrong), give it some more squeezes to get the soap all the way through the sponge. Rinse it under more warm water and do more gentle squeezes to rinse the soap all the way through. A couple more gentle squeezes to get water out, then set it out to try. If you are super fancy, you can get a makeup sponge holder thingy, which basically looks like an egg cup and makes me unreasonably happy.
Cleaning Your Puffs/Poofs
You’re on your own for this one. I dunno. Fire?
Final Thoughts
My best advice for brushes is to find ones that you like to use. One of the reasons I have so many fantasy-inspired makeup brushes is that it helps make the makeup feel fun to apply. Of course it’s also important to find brushes that hold together well, that fit your hands are comfortable to use, and that you’ll be happy with.
That’s it for today– join us next time when I try to develop a guide to beauty lingo.
Kisses,
Glitz Woolf.
